
When xTool reached out to me to test and review their M1 hybrid laser and blade cutter, I jumped at the opportunity! There are so many cool things to make with a laser cutter. Crocheters like you can laser cut custom stitch markers, branded tags and labels, earrings, basket bottoms, display stands and signs for craft markets, etc.
This review will teach you all about the xTool M1 hybrid laser and blade cutting machine, so you can decide if it’s the right tool for your craft room.

Disclaimer: Please note that some of the links contained in this post are affiliate links. If you make a purchase through one of the links, you will pay the same prices as always, but You Should Craft will receive a small commission that helps us provide free crochet patterns. As an Amazon Associate, I earn from qualifying purchases.
tl;dr – Is the xTool M1 worth it?
I’ll describe all the reasoning below, but if you don’t feel like reading the full review then YES — the xTool M1 machine is totally worth it for hobby crafters who want to expand into laser cutting. So far, I’ve tested out the laser and blade cutting on 3mm basswood, metal, heat transfer vinyl, and slate coasters with positive results. I’ll continue to update this review as I try out new materials.
Before I committed to the lovely folks at xTool, I did my own research about the machine. Everything looked promising, so I agreed to test it out for you. I’ll share my research, test projects, and full review with you so you can decide if the xTool M1 fits your needs and budget.

What is the xTool M1?
The xTool M1 is a hybrid desktop crafting machine that can cut with a laser (like a Glowforge) and a blade (like a Cricut or Silhouette). The M1 uses a diode laser head that can produce high-quality, precise engraving and cutting on a variety of materials. Since it’s a hybrid machine, the xTool M1 also has a blade that allows you to cut thinner materials (like vinyl and felt).
What I love most about the xTool M1 is that it has both the diode laser AND the blade. If your craft space is already filled to the brim with yarn and crochet hooks, there’s not room for two new crafting machines.
With the M1, you don’t have to choose between a laser cutter and a blade cutter. It’s easy to switch between the laser and blade for different projects, so you can make a notions pouch with heat transfer vinyl, then turn around and make laser cut earrings.

xTool M1 also has a camera that allows you to see the whole working space in the xTool Creative Space software. The camera preview helps you line up your cut files with the material, so you can maximize space and get even cuts.
xTool M1 Price – Machine Cost
There are two different versions of the xTool M1, based on which wattage you need:
- xTool M1 5W Basic – $1299 MSRP (often on sale for $899)
- xTool M1 10W Basic – $1499 MSRP (often on sale for $999 – $1099)
If you can afford it, definitely go with the 10 watt (10W) version. The stronger laser will finish projects more quickly than the 5W version, so you can make more stuff.
How big is the xTool M1?
The xTool M1 is about the size and weight of a large household printer, so you can put it on a standard desk or table. Mine’s on the window bench in my office so it can vent while laser cutting. It’s light enough that I can move it without help if needed.
- M1 Dimensions: 21.93″ wide x 17.83″ deep x 9.06″ tall
- Weight: 21.6 lbs
- xTool M1 working area: 15″ wide x 12″ long
The xTool M1 cutting size is about 12 x 15 inches, but this may change based on the accessories you purchase. For example, the honeycomb and riser base set will slightly decrease the M1’s working area.
What can you cut with the xTool M1?
Using the laser, the M1 can cut and engrave wood (up to 10 mm), opaque acrylic (up to 3 mm), paper, foam, fabric, felt, leather, rubber, and stone.
With the blade, you can cut thinner materials like vinyl, felt, and leather.
The M1 also engraves plastic and metal.
So far, I’ve tested out basswood, heat transfer vinyl, metal, and slate with my xTool M1 and I describe the results in this review. I’ll continue to update as I use the hybrid laser blade cutter with more materials.

What kind of laser does the M1 use? – Diode vs CO2 Lasers
In the crafting world, there are two main types of lasers: diode and CO2. The xTool M1 is available with either a 5W or 10W diode laser. Glowforge uses a 45W CO2 laser.
Diode lasers are more economical than CO2 lasers, which means they’re perfect for hobby crafters and crocheters. You can snag an M1 10W for about $1000, but a Glowforge Basic starts at around $4000. The M1 is so much more affordable!
Diode lasers are also more durable than CO2 lasers, so you’ll get more life out of your laser.
Though they’re cheaper and more durable than CO2 lasers, diode lasers are less powerful. A diode laser will have a slower speed of cutting and engraving. This isn’t a big deal if you’re making things for yourself or your friends, but it will matter if you’re running a laser cutting business.
If more power is important to you, check out xTool’s D1 Pro (available with a 20W diode laser) or their new P2 machine (with a 55W CO2 laser).

Does the xTool M1 have air assist?
xTool M1 has optional air assist (photo above), which can be purchased as an add-on attachment. I highly recommended getting the air assist if you think you’ll be doing a lot of cutting with the laser.
Below you can see a picture of the basswood I used to cut out my DIY stitch markers and earrings. The left side was all cut first, before I installed the air assist. The right side was cut after the air assist was installed. Notice the yellowing and browning around the edges of the circles on the left side? There’s hardly any on the right side.

Air assist blows high pressure air as the laser cuts and engraves. On the M1, air assist is an exterior attachment that connects to the laser module with a tube. The air assist nozzle attaches to the laser with a magnet.
Once installed, air assist helps keep smoke and debris away from the laser. This minimizes scorching and burning (especially on wood). You’ll notice cleaner cuts and less browning and yellowing on the wood.
I’ve included some comparison photos below, featuring my laser cut earrings. Can you tell which ones had air assist, and which ones didn’t? Both the cutting and engraving were much more clear with the air assist.

Unboxing and xTool M1 Set-up
My xTool M1 arrived when I was on vacation, and my aunt pulled it inside the house for me. She texted about a huge box being delivered and she was totally right — the box is ginormous. My office is upstairs, so I asked my partner to carry the box up the stairs for me. It’s pretty heavy, but also hard to get a good grip on a box so big.
The xTool M1 box was shipped in a shipping box, which is an extra layer of protection for the machine and all its components.

What comes in the box?
When you open up your xTool M1 box, you’ll find:
- xTool M1 machine
- Exhaust pipe kit (for venting outdoors)
- Power cord
- USB cord
- 10 Triangular prisms
- Two cutting mats (one pink and one blue)
- Five 45° replacement blades
- Basic materials pack with sample materials
Since I ordered the M1 10W Deluxe bundle with RA2 Pro rotary accessory, and added on air assist, I received a second box with the RA2, air assist, and premium material box.

Setting up the xTool M1 to Review
The hardest part was the actual unboxing. There were two huge boxes (the shipping box and the M1 box) and not a ton of floor space in my office. You could do it all solo, but it’s easier if there’s another person to help you hold and break down boxes to move them out of the way.
Setting up the xTool M1 is pretty easy, once you get it out of the box.
Once everything is unwrapped, set it up on your table, peel off the labels and plastic cover, screw in the exhaust hose mount and attach the hose, then plug in your new hybrid laser and blade cutter. Connect the USB cord to the xTool M1 and your computer so you can start laser cutting!
The instructions in the box were clear, but here’s a helpful video from xTool to walk you through the set-up process.

Note: If you want to use the blade cutter first, you’ll need to install the blade as well. I don’t keep the blade on unless I’m working on a blade cutting project, so I skipped this step.
xTool Creative Space (XCS)
Your xTool M1 uses the xTool Creative Space software (XCS). The XCS software is basic, but intuitive. I don’t have a Cricut/Silhouette or Glowforge machine, so this was my first time using a software like this. However, based on reviews it sounds similar to Cricut Design Space.
I poked around and was able to get the hang of XCS quickly. I combined some shapes and used a default text to engrave a metal dog tag.
With XCS, you can design images or upload your own files (like SVG, PNG, JPG) that you’ve made or purchased.
If you plan to sell your design files, I recommend designing in another program (like Illustrator or Inkscape), so you can download SVG versions of your designs. You can save project files in xTool Creative Space, but they’ll all be .xcs files.

One exciting feature of the XCS software is that you can use it offline, unlike the Glowforge software. It also doesn’t have to be connected to an M1 machine, so you can prep your designs before you plug in your computer. ORRRR you could test out the software while you wait for your new xTool M1 to arrived. 😉
xTool M1 Projects: Testing out the Cutting and Engraving Functions
To get a feel for the xTool M1 machine, I did a few test projects to see how it performed. I engraved on metal and slate, cut heat transfer vinyl with the blade, and cut and engraved wooden stitch markers and earrings with the laser.
All of my projects were completed using xTool materials from the sample pack and Premium Material Box.
Metal Dog Tag – Laser Engraving
For my first project, I laser engraved the metal dog tag that came with the xTool M1. I used the XCS software and fonts to write out my dog’s name, then engraved it using the laser.
The dog tag was a super quick project that only took a few minutes. It turned out great, especially for a first try!
The default settings in Creative Space worked well for this project.

Wooden Stitch Markers – Laser Cutting and Engraving
Next, I went a little overboard on the wooden stitch markers front. These cuties involved scoring, engraving, and cutting 3mm basswood with the laser. I designed an SVG file in Adobe Illustrator, then opened it in XCS and picked out the stitch markers I wanted to cut. The software already has default settings for 3mm basswood, so I used those.
Since I’m still new to the xTool M1, I cut a couple at a time to make sure everything was going as planned. The M1 was able to engrave/cut six stitch markers in one pass in approximately five minutes. They turned out exactly how I hoped, so yay!! 😍
➡ Get all the full tutorial and download a free stitch marker SVG file.

Slate Coaster with Logo – Laser Engraving
I wanted to see how the xTool M1 handled a larger, more complicated engraving, so I tried out a slate coaster. It was about 4×4 inches and the design is slightly smaller. The You Should Craft logo has a lot going on in the floral wreath behind the text, so this seemed like a good challenge.
I uploaded a black PNG file to xTool Creative Space and used the default slate coaster setting. This was my longest project and it took the xTool M1 about 25 minutes to engrave the You Should Craft logo using the default settings.
Once it was done, it looked so good!! I’m excited to use my coaster around the house or in future Instagram photoshoots.

Sidebar: the slate coasters that came in the Premium Material Box were such high quality! They’re heavy and have little foam nubs on the corners to protect your table.
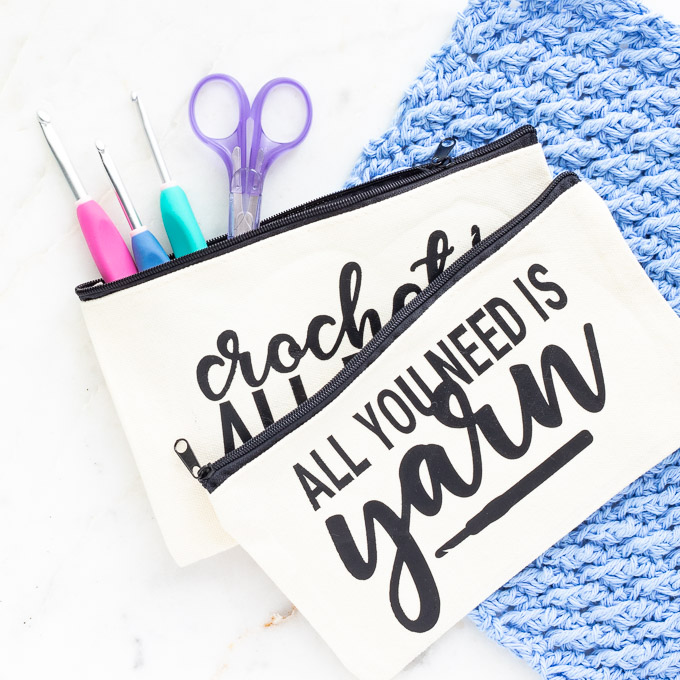
Heat Transfer Vinyl – Blade Cutting
What’s the point of a hybrid laser and blade cutter if you only use the laser?! You know I had to test out the blade cutting too.
Using black heat transfer vinyl from the material pack, I cut out two different crochet quotes and made cute little canvas notions pouches.

The blade cut clean, which made weeding a breeze. xTool’s sticky blue cutting mat was so handy! It sticks to both the vinyl and the base of the M1 work surface, so there’s no accidental wiggling around while you cut.
Being able to see everything using the camera was helpful for lining up the quotes, especially when I was on my last little leftover square of vinyl.
➡ Peep the step-by-step tutorial and free crochet quote SVG files
Wooden Earrings – Laser Engraving and Cutting
Finally, I made several different sets of laser cut earrings, then crocheted onto them. This project gave me a chance to test out the newly installed M1 air assist AND combine laser cutting with crocheting.
All the earrings were made using 3mm basswood and the default settings in XCS. I made the earring cut files in Illustrator, then uploaded them to xTool Creative Space. Using the default settings, it took the xTool M1 about nine minutes to cut out three pairs of 1.5 inch earrings.

When the xTool M1 finished cutting and engraving the earrings, I crocheted over them with DK weight cotton yarn and attached the earring findings. Aren’t they so cute?!
➡ Flower earrings crochet pattern & free SVG
➡ Boho earrings crochet pattern & free SVG

xTool M1 Review Summary
I have loved testing out the xTool M1 for this review, and you know this won’t be the end of my laser cutting adventures. So far, this machine has surpassed my expectations and made everything I wanted. Overall, I would recommend the xTool M1 to hobby crafters or crocheters who want to dabble in laser cutting.
Here’s a summary of all the pros and cons, so you can decide if the M1 is right for your craft room.
xTool M1 Pros & Benefits:
- Cuts and engraves many different materials – I primarily wanted to laser cut wood, and the M1 has excelled on that front.
- Easy set-up – getting it out of the huge box was the hardest part of the set-up. Otherwise, plug in a couple things and you’re good to go!
- Straightforward, easy-to-use software
- Quiet operation – there’s a bit of quiet buzzing as the laser moves back and forth, but you can totally work in the same room while it cuts/engraves
- Cuts with a blade too!
- Excellent price point relative to other laser cutters
- Great size for a craft room (no special tables required) and light enough for one person to move
- Works with any brands of materials (like from Amazon, Cricut, craft stores, etc.)
- Expandable base to do larger projects (like engraving tumblers or taller items)
- Lots of add-ons and attachments like air assist (for minimizing scorching on wood), the rotary attachment (for engraving on tumblers), the smoke purifier (if you can’t vent outdoors), etc.
- Opening the lid stops the machine (so you don’t get hurt by the laser/blade)
- Easy to clean the laser module
xTool M1 Cons & Considerations:
- Air assist isn’t standard – If you’re cutting/engraving complicated patterns on wood, you basically need air assist, which unfortunately has to be purchased separately
- There’s a noticeable smell when you work. – I kind of like the burning wood smell, but I’ve heard it’s worse if you’re working on acrylic. If you’re sensitive to smells, you may want to invest in the smoke purifier
- Slower cutting/engraving than a CO2 laser – this is to be expected with a 10W laser versus a 45W laser. It doesn’t matter to me since I just work on the computer while the M1 does its thing, but it might matter to you if you have a laser cutting business.
- Only comes with 45 degree blades – others need to be purchased separately
- Struggles to cut some colors of acrylic (based on other xTool M1 reviews, I haven’t tried acrylic yet)

Buy the xTool M1
If you found this review helpful and you’re ready to purchase your own xTool M1, please use one of the links in this post. You’ll pay the same price, but You Should Craft will receive a small commission that will help keep the free crochet patterns flowing.
Frequently Asked Questions
xTool M1 5W vs 10W
You can read more in the review about, but the biggest difference between the two versions of the xTool M1 is price and power. If you can afford it, I highly recommend paying a bit more for the xTool M1 10W. It’s double the power, so it will laser cut and laser engrave faster than the 5W version.
xTool M1 vs Glowforge?
The biggest differences between the Glowforge and xTool M1 are: price, power, size, laser, and the ability to do blade cutting. The xTool M1 has a diode laser, which allows it to have a smaller size and a much more accessible price point ($1000 vs $4000). The M1 also doubles as a blade cutter, which is great for those of us with small craft spaces. However, the diode laser is much less powerful than the Glowforge’s CO2 laser, which affects both the speed of cutting and the cutting capabilities.
Both machines are extremely accurate for cutting and engraving, and both machines have a preview camera.
When deciding between the GlowForge laser machine and M1, ask yourself what you need. If you’re an experienced laser cutter with a laser cutting Etsy shop, it definitely makes sense to go for a faster, more powerful, more expensive CO2 laser like a Glowforge or the xTool P2.
However, most other people (especially hobby crafters and crocheters) would be better off choosing the xTool M1. It’s a quality machine at a much more affordable price. I found that the xTool M1 was able to do everything I needed for my crochet-adjacent projects. Plus, it fits on my window bench.
xTool M1 vs D1 Pro?
xTool’s D1 Pro and M1 both have a diode laser. Compared to the xTool M1, the D1 Pro has a larger cutting surface (that’s expandable), no preview camera or blade cutting, and a lower starting price point (10W D1 Pro starts at $850 MSRP). The D1 Pro is also available in a more powerful 20W diode laser for $1400 MSRP, or you can purchase a 40W laser attachment.
Where can I find tips on how to use the xTool M1?
The xTool M1 Facebook group is filled with active, happy customers who often share tips, reviews, settings, and cool projects.
Where can I find cut files for the xTool M1?
For free cut files, try a quick Google search or scroll through the projects in the xTool Community. If you’d like to purchase ready-made cut files and SVGs, check out Etsy.

More Stitch Tutorials & Patterns
If this xTool M1 review post was helpful, be sure to pin it to your Pinterest boards by hovering over any image above and clicking the pin-it button in the upper left corner.
Then, stick around YouShouldCraft.com and browse our: