If you’re following along in our Newbie Series — hooray! You’ve made it to Day 3 and are about to start your very first crochet project. This simple mug rug crochet pattern is free and features two-toned fringe. You won’t even have to weave in your ends!
Making stuff is the whole reason you’re taking this mini-course, right? After today, there’s a whole lot more stuff to make. This crochet mug rug is just the first of the 14 beginner crochet patterns we’ll be tackling this month!
If you’re not a newbie and you just love mug rugs, heyyy! 🙋🏼♀️ I’ve rounded up the best free coaster and mug rug patterns for people just like you!

Disclaimer: Please note that some of the links contained in this post are affiliate links. If you make a purchase through one of the links, you will pay the same prices as always, but You Should Craft will receive a small commission that helps us provide free crochet patterns. As an Amazon Associate, I earn from qualifying purchases.
Why a Free Mug Rug Crochet Pattern?
Some of you newbies might be wondering – why mug rugs? why now? why fringe?
Like everything in the Newbie Series, there’s a method to my madness! I picked these sweet fringed mug rugs as our first crochet project becauseeee:
✔️ there are no ends to weave in
✔️ the fringe covers potentially wiggly beginner edges
✔️ they are quick, easy, and perfect for practicing those single crochet stitches
✔️ they’re handy and make great gifts (who doesn’t want a handmade present?!)
Day Three Objectives
After completing today’s lesson, you’ll be able to:
- follow a simple pattern
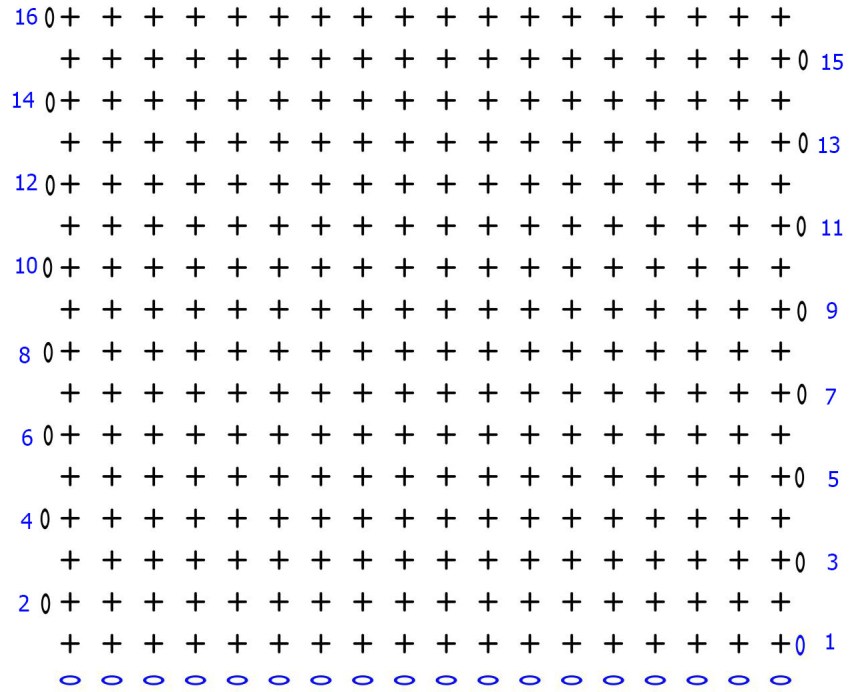
- read a simple stitch chart
- add simple fringe
- crochet a set of fringed mug rugs for everyone you know
Wishing you had a 30-day mini course for newbie crocheters, featuring streamlined supplies, thoughtful objectives, and super cute patterns? Sign up here! ⬇️⬇️
Tools Needed for the Mug Rug Crochet Pattern
This is the first day of the 30-Day Newbie Series where it matters which hook(s) and yarn you choose.
Cotton yarn is the best for kitchen-type projects (like coasters, dishcloths, and potholders) because it’s durable, absorbent, and heat resistant. My favorite cotton is Dishie from WeCrochet, which is soft, inexpensive, and has excellent stitch definition. I used the Blue and Azure colorways for my sample mug rugs.
You’ll also need *both* of your crochet hooks – the H 5.0 mm and the J 6.0 mm. Cotton yarn doesn’t stretch as much as acrylic, so use the larger hook to crochet the starting chain. Then, switch to the smaller hook for the single crochets.
Share your Fringed Mug Rugs!
I love seeing what you’ve crocheted! Whether you’re participating in the 30-day Newbie Series or not, use #YSCNewbie to show off your WIPs and finished mug rugs!
Regardless of your social media preferences, be sure to tag me (@youshouldcraft) in your posts so I can drool over your projects and re-share your work in my stories and on my feed!
And if you’re a Facebook person, share your work and connect with other crocheters in The You Should Craft Crochet Community FB group!

How to Crochet a Mug Rug
Supplies / Materials
- 25 yards of Dishie cotton (two colors)
- or 25 yards of your favorite worsted weight (#4) cotton yarn
- H 5.0 mm crochet hook
- J 6.0 mm crochet hook (both of my hooks are from the WeCrochet Bright Hook Set)
- Scissors
- Credit card or gift card (for measuring fringe)
NOTE: My friends at WeCrochet provided the supplies for the Newbie Series.
Size / Gauge
Gauge doesn’t matter for this project, but 4 x 3.5 inches = 16 rows of 15 sc
Finished mug rugs are approximately 5 x 3.5 inches (without fringe)
Abbreviations and Techniques
- ch – chain
- sc – single crochet
NOTE: This pattern uses US crochet terminology.
Fringed Mug Rug Video Tutorial
Mug Rug Crochet Stitch Chart
We’ve looked at the first four rows in our previous tutorials, but here’s the full stitch chart for the fringed mug rug. The mug rug crochet pattern uses only chains and single crochets.

Fringed Mug Rug Crochet Pattern
With your main yarn color, ch 19 with a J 6.0 mm hook
Switch to an H 5.0 mm hook
ROW 1: sc in second ch from hook, sc across. (18)
ROW 2 – 16: ch 1, turn. sc across. (18)
Trim your yarn leaving a tail of approximately 3 inches. Use your crochet hook to pull the yarn all the way through the last stitch (see picture below).

Adding Fringe
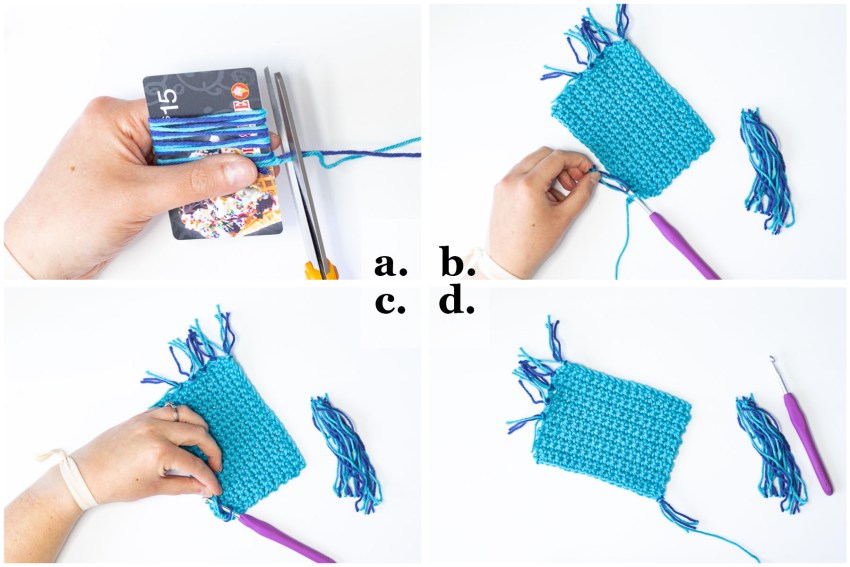
- a.) Holding the strands from both colors of yarn in your hand, wrap it around a gift card eight times. Trim yarn with scissors. This will create enough fringe strips for one side of the mug rug.
- b.) Insert your hook into the corner of the mug rug. Loop two strands of fringe onto the hook and pull it through.
- c.) Cross the fringe over the front of the crochet hook and use the hook to pull the fringe through the loop. If there is a yarn tail in this corner, include it in this step
- d.) Repeat this process a total of eight times per side. Trim your fringe as desired
NOTE: If you want super even fringe, you can use a ruler and a rotary cutter.

Y’all! Pat yourself on the back because you’re done with your first ever crochet project! Keep it, frame it, use it, or make a whole set of crochet mug rugs for your bestie. You do you, booboo!
More Free Crochet Patterns
You’ll love these other free crochet patterns:
- More free crochet mug rug patterns
- More single crochet patterns for beginners
- Beginner bows in three sizes


