
Today is all about how to crochet a chain. The humble chain stitch or starting chain is the foundation of every project in the Newbie Series, and most crochet projects you’ll encounter.
As you become a more experienced crocheter, you’ll learn more about other ways to start your projects (e.g. foundation stitches, magic ring). However, almost all of the other methods can be replaced with chain stitches if needed.

Disclaimer: Please note that some of the links contained in this post are affiliate links. If you make a purchase through one of the links, you will pay the same prices as always, but You Should Craft will receive a small commission that helps us provide free crochet patterns. As an Amazon Associate, I earn from qualifying purchases.
Crochet Chain Learning Objectives
If you follow along with today’s “How to Crochet a Chain” post and video tutorial, you’ll be able to:
- Identify the chain abbreviation in patterns and the chain symbol in crochet charts
- Label the parts of a crochet chain
- Hold your yarn and crochet hook in a way that’s comfortable for you
- Crochet starting chains and chain stitches
Are you a new crocheter? Join our 30-day Newbie Series to receive daily tutorials, simple patterns, and round-ups that will teach you how to crochet. Sign up here: ⬇️⬇️
All About Crochet Chains
Identifying Chains in Patterns and Charts
There are two main types of crochet instructions: written patterns and stitch charts. Patterns use words and abbreviations to describe what to do in each row or round, and charts use symbols to show which stitches to use.
Chains are represented in patterns with the abbreviation “ch” and are denoted in charts with an open oval shape.
Let’s look at a chart:

See the blue horizontal ovals along the bottom? Those make up the starting chain stitches. See how there’s one extra blue oval, but it’s vertical? That’s also part of the starting chain.
If we count all of the blue ovals (the horizontals and the one blue vertical), we can see that we need a starting chain of 19.
If we saw a written pattern for this same project, the starting chain would be written as: ch 19
Parts of a Chain Stitch in Crochet
Each chain has three main loops. The top of a chain (closest to the hook in the image below) looks like connected v’s (<<<<). Each “v” or chain has two parts: the back/top loop, and the front/bottom loop.
The back of the chain (furthest from the hook in the picture below) looks more like traditional chain links (like on a necklace chain). The nub that sticks out is referred to as the back bump.
You can crochet into any of these three loops (top, bottom, or back bump), and some patterns will specify where to put your stitches.

How to Crochet a Chain Stitch
Below, you’ll learn how to crochet the simple chain stitch with step by step photo and video tutorials. Once you get the hang of it, it’s easy to crochet a chain.
Supplies / Materials
You can use any hook and yarn to crochet chain stitches, so practice with whatever you have on hand. If you’re following along in the Newbie Series, you can use either your worsted weight acrylic yarn or your worsted weight cotton yarn.
For the tutorial photos and video, I used:
Video Tutorial – Learn How to Chain
Here’s a video to show you how to crochet starting chains. It reviews a lot of the information found in this post (like abbreviations and parts of a chain).
How to Make a Slipknot Step by Step
In crochet, starting chains start off with a slip knot. The written instructions for a slipknot are tricky, but hopefully the images will clarify the description.
- With your dominant hand, hold the yarn with your thumb and index finger. Create a backwards “D” with the yarn and insert two fingers from the opposite hand
- Flip the two fingers 180 degrees clockwise, in order to twist the “D” (this will make an “X” in the center)
- Use the thumb and index finger of your nondominant hand to grab the shorter tail of yarn
- Pull it the tail through, tighten it up, and insert your crochet hook

There are LOTS of ways to hold your yarn, but traditionally, it’s held in your nondominant hand. I actually hold both my yarn and my hook in my right hand, which is atypical. I’ve crocheted “the right way” in this series.
When crocheting the standard way (with a hook in my dominant/right hand and the yarn in my nondominant/left hand), I wrap the yarn under my two middle fingers and loop it around my index finger (shown in the image below).
You should try different options to see what feels best. It doesn’t matter how you hold your yarn as long as it’s comfortable for you and gives you enough control over your tension. Here are tons of pictures of possible ways to hold your yarn and hook.

Photo Tutorial – How to Crochet a Starting Chain
We’re ready to actually start crocheting our chain! Once you learn how to make a chain in crochet, you’ll be well on your way to crocheting your first project.
NOTE: I’m using the “knife grip” in the pictures, but hold your hook in whatever way feels most comfortable to you. As a new crocheter, you may need to try a few different ways before you find what works best for you.
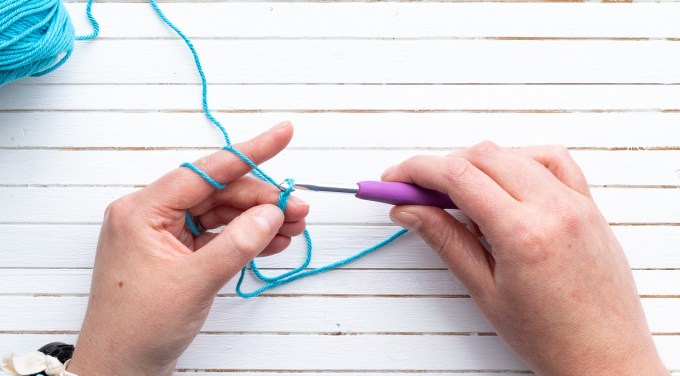
To make a chain in crochet, hold your slipknot with your nondominant hand and your hook with your dominant hand.

Yarn over (image above) and pull through the loop on your hook (image below). This is one crochet chain stitch.
Repeat this process until your chain is the desired length, or the length specified in your pattern. Try to moderate your tension so your crochet chains are all approximately the same size.
Frequently Asked Questions (FAQ)
Here are some commonly asked questions about how to crochet chain stitches.
What is a chain stitch used for in crochet?
Crochet chains often serve as the foundation for crochet patterns (like the simple fringed mug rug or beginner bows). Crochet chains are also found within projects. You’ll often use a short chain to turn your work, or to create spaces or lace within your crochet project (like in the Window Pane Cardigan or Boho Plant Hanger).
How to start a crochet chain for a blanket?
To crochet a starting chain for a blanket, you’ll start with a slipknot (as shown above). For a blanket, the length of the chain will depend on the crochet pattern, yarn, and desired size.
