
There have been lots of teasers on classic granny squares and join-as-you-go crochet tutorials, but the day is finally here — I finished my granny square crochet blanket and am going to share the pattern/tutorial with you, dear readers!
If you’re a beginning crocheter, or someone who has never tackled a large project, this afghan is an excellent place to start. It only uses two colors, and is made by joining together a bunch of large granny squares. I found that the larger sized granny squares help to make a big project like an afghan feel like lots of smaller projects, which makes you feel accomplished.

Disclaimer: Please note that some of the links and banners contained in this post are affiliate links. If you make a purchase through one of the links, you will pay the same prices as always, but You Should Craft will receive a small commission that helps to keep the site up and running.
As a bonus, because it’s made of granny squares, you don’t have to carry a huge blanket around. You can easily bring your work with you on the train as you commute to work, or on an airplane as you fly to your cousin’s wedding.
If you choose the latter, try not to drop your tapestry needle between the seats; you will never find it, even if the flight attendant feels bad for you and gets down on her hands and knees with a flashlight to help you look. Trust me.

Supplies:
6 skeins of Caron Simply Soft yarn in Pagoda (main color)
3 skeins of Caron Simply Soft yarn in Soft Grey Heather (joining and border color)
H8/5.00 mm crochet hook
Tapestry Needle
Scissors
Caron Simply Soft is a worsted weight yarn and each skein contains 315 yards (288 meters). If you can’t find Simply Soft, you can replace it with any soft, worsted weight yarn.
Abbreviations:
ch = Chain
sl st = Slip Stitch
dc = Double Crochet
As written, the finished granny square crochet blanket produces a final product that is square and measures approximately 48 inches x 48 inches. However, you could easily adjust the size by adding more or less granny squares to your afghan.
Add this pattern to your Ravelry Queue!

Granny Square Crochet Blanket – Written Pattern
Granny Squares:
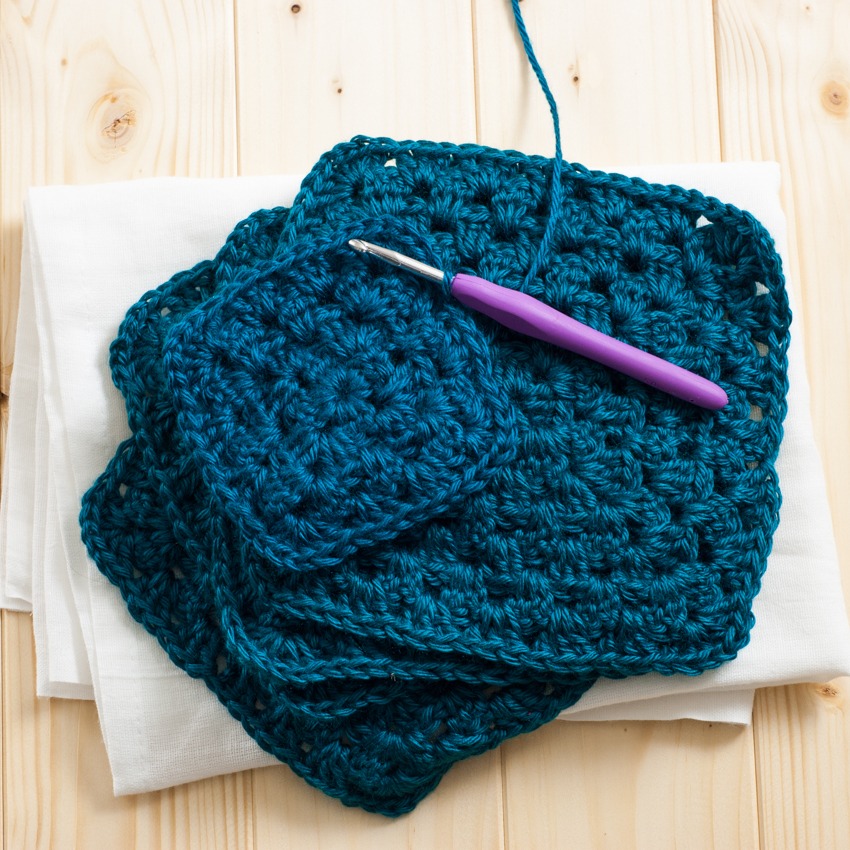
Make 36 7-round granny squares in your main color. You can use my tutorial, or the written pattern below. Each finished square is ~ 6.5 inches across.
Ch 4 and join with a sl st.
Round 1: Ch 2 (counts as first dc), 2 dc into the center of the ring. *Ch 1, 3 dc into the center of the ring.* Repeat the * section two more times, then join to the first dc (NOT the chain) with a sl st.
Round 2: Ch 2, turn. 2 dc into space below ch, ch 1, 3 dc into space. This will create your first of four corners. Below next chain (in the gap between the 3 dc clusters) crochet *3 dc, ch 1, 3 dc* (repeat * section 2 more times, for a total of four corners). Connect to the first dc with a sl st.
Round 3: Ch 2, turn. 2 dc into space below ch. In the corner space, 3 dc, ch 1, 3 dc (for your first corner). *3 dc in the next space, in the corner 3 dc, ch 1, 3dc* repeat * section 2 more times. Connect to first dc with a sl st.
Round 4: Ch 2, turn. 2 dc into space below ch. In the corner space, 3 dc, ch 1, 3 dc. *3 dc in the next 2 spaces, in the corner 3 dc, ch 1, 3dc* repeat * section 2 more times. 3 dc into the final space. Connect to first dc with a sl st.
Round 5: Ch 2, turn. 2 dc into space below ch. 3 dc in next space. In the corner space, 3 dc, ch 1, 3 dc. *3 dc in the next 3 spaces, in the corner 3 dc, ch 1, 3dc* repeat * section 2 more times. 3 dc into the final space. Connect to first dc with a sl st.
Round 6: Ch 2, turn. 2 dc into space below ch. 3 dc in next 2 spaces. In the corner space, 3 dc, ch 1, 3 dc. *3 dc in the next 4 spaces, in the corner 3 dc, ch 1, 3dc* repeat * section 2 more times. 3 dc into the final space. Connect to first dc with a sl st.
Round 7: Ch 2, turn. 2 dc into space below ch. 3 dc in next 3 spaces. In the corner space, 3 dc, ch 1, 3 dc. *3 dc in the next 5 spaces, in the corner 3 dc, ch 1, 3dc* repeat * section 2 more times. 3 dc into the final space. Use an invisible join to connect to the first chain, then weave in the ends.

Join-As-You-Go:
Using the Soft Gray Heather yarn (or your border color of choice), begin to join-as-you-go. I’ve posted a photo tutorial if you’re not sure how.

To join-as-you-go, follow the pattern shown in the image above to connect your granny squares. I prefer to start joining my squares before they’re all finished, it allows me to mix it up when I get bored of making squares. Plus it’s easy to see how much progress you’ve made when it’s all laid out and semi-connected, rather than in a big pile of squares.
I used a Russian join to connect each new skein of grey yarn, so that my joining could be continuous. There’s an excellent Russian joining tutorial on the Craftsy if you’re not sure how to do it. This was the first time I had ever used it and really love the technique — so easy! It adds a little extra thickness to the stitches around the join, but it’s barely noticeable on a large project like this.

When you finish joining your granny squares, crochet around the last three sides of the blanket.

Use a seamless join and weave in your ends.

Border:
For my border, I treated the contrast blanket as one big granny square. It already had a gray border from finishing off the join-as-you-go, so I began by adding another round of the Pagoda color I used for the granny squares. This follows the exact same pattern as the granny squares — 3 dc in each side space and 3 dc, ch 1, 3 dc in each corner.

I considered stopping here, but decided that the contrast blanket needed more gray, and a smidge more pizzazz.

First, I crocheted another round of gray, following the same granny square pattern. Then, I added the final zig-zaggy layer, which had a little bit of a ruffle.
In order to accomplish this effect, you’ll treat every space, be it side or be it corner, the same. Throw down 3 dc, ch 2, and 3 dc into every. single. space. I found that the chain 2 between the clusters helped each zig to zag properly, and to make the top pointier. When you reach the end, connect to the first dc with an invisible join and weave in your ends.

Of course, you can use any border method you like, but I love how mine turned out. The zig-zags add some extra interest to the edges, and they create a slight ruffle since you’re crocheting so many extra stitches.

Pretty, no? I love, love, love my granny square crochet blanket! The only problem now is figuring out what to do with it. We have a lot of blankets already, so we could either upgrade to this new granny square blanket, or I could gift it. I’m attached, but you can’t keep everything you make, right?! Sigh.
Don’t forget, if you make your own contrast blanket, be sure to share it with me on social media! You can use #youshouldcraft on Instagram, or just post it to the You Should Craft Facebook page!
This post was shared at: The Pretty Pintastic Party, Lou Lou Girls, Funtastic Friday, Sundays at Home, Crafting Along, The Wednesday Showcase, and Hookin on Hump Day.
